Computer Networking Solutions.
Scott Dunn from windowssecrets.com writes about problem with Windows XP Service Pack 3. He says “from the moment Microsoft released it, Service Pack 3 for Windows XP has been the subject of almost daily reports of bugs, incompatibilities, and general headaches.
You can install SP3 with confidence — providing you take certain precautions — or, if you prefer, use Windows' Automatic Update settings to keep the service pack off your system.”
Read the full story at http://windowssecrets.com/comp/080911
He also explains about making an upgrade decision that works for us. He says, In light of these and other problems, you may wonder whether you ever want SP3 at all, especially given that many of its enhancements focus on networking and IT-level administration. He advice us to consider about think security, consider support and be prepared. For full story at http://windowssecrets.com/comp/080911
Lastly he gives step on how to remove SP3 from your automatic updates.
This is the step:
If you decide you don't want SP3, Microsoft offers a tool for suppressing the automatic installation of the service pack. The Service Pack Blocker Tool Kit won't prevent you from downloading SP3 manually from the company's site, nor will it stop you from installing the patches from a CD or DVD. All it does is stop the service pack from being installed via Windows' Automatic Updates.
In addition, the Service Pack Blocker postpones the installation for only a year from SP3's release date last April.
Surf over to Microsoft's Service Pack Blocker download page and click the Download button for SPBlockerTools.exe. Click Yes to accept the license agreement and type in the path to the folder where the files will be stored (click the Browse button and navigate to the folder if you want to avoid typing).
Now open the folder containing the extracted files and double-click SPBlockingTool.exe. A command prompt window appears for a few moments and displays the statement "Action successfully completed." Unfortunately, that doesn't tell you very much. The action the message refers to is the addition of a Registry entry instructing Windows Update not to send you SP3. (The same setting on Vista blocks SP1.)
If you want to see the code that is added, do the following:
Step 1. Choose Start, Run. Type regedit and press Enter.
Step 2. In the Registry Editor, navigate in the left pane to this entry:
HKEY_LOCAL_MACHINE \ SOFTWARE \ Policies \ Microsoft \ Windows \ WindowsUpdate
Step 3. With the WindowsUpdate icon selected in the left pane, look in the right pane for a key named DoNotAllowSP.
If you later decide you want Automatic Updates to offer you Service Pack 3, simply select the DoNotAllowSP key and press Delete (or click Edit, Delete).
If you're concerned about editing the Registry (which involves risks of its own), the Service Pack Blocker can also undo the block:
Step 1. Choose Start, Run. Type cmd and press Enter.
Step 2. At the command prompt, either type the path to the SPBlockingTool.exe file, or drag the file into the command prompt window and let Windows do the typing for you.
Step 3. At the end of this command, type a space followed by /U and press Enter.
Once again, you'll see the "Action successfully completed" message and Windows Automatic Update will no longer be blocked from installing the service pack on your system.
The other tool included with the download, SPreg.cmd, is a batch file useful for administrators who want to block the service pack on remote computers; this utility requires that the machine name be specified in the command line.
Even though most of SP3's problems should now be in the past, these precautions can help ensure that you aren't one of the service pack's installation victims.
Computer Networking Solutions.
Thursday, September 11, 2008
Wednesday, September 10, 2008
Computer Networking Solution: Does Restore function restore everything?
Computer Networking Solution: Does Restore function restore everything?
All of us know that Windows has RESTORE function. But does it really restore everything. Read below for some info.
To give a simple answer to the question,
Yes, Microsoft system restore sometimes do not "fix" everything.
OK, now a little more detail...
It is designed to only make "restore points" at certain specific times "it thinks" are important AND it then it only protects a VERY limited sub-set of MS stuff that MS uses inside the OS...
Note that making or storing an "MS Restore Point" can be done manually at any time, up to the limitations of "allowed space" it was assigned (or set to...) At that point, it starts to
"get rid of" older restore points.
It is NOT (and was not designed to be) an Image Program that would take a snapshot of the entire computer "as of" a certain point in time and restore the entire HD contents to the condition at that time.
Someone else will likely give good links to WEB sites that can explain this in much greater detail, but for now, if you are "sure" you used a MS Restore Point before the problem first
"happened", I believe you need to "fix" the original problem instead. As John has said, someone on the list will be happy to help with that if we can.
Restore does not always fix a problem. Even worse, sometimes you fix a problem only to have it re-develop from a restore file. A lot of anti-virus and anti-malware programs ask you to disable system restore during the fix process so that you will not become re-infected...
Computer Networking Solution
Thursday, July 31, 2008
New Phishing Technique..Beware!!! (Computer Networking Solution)
Computer Networking Solution: New phishing technique.... Beware!!!
We all know or at least heard about phishing. The tipical example for phishing is you received email from your bank saying they are updating customer database and want you to logon to your bank account and update your record. In the email there is a link for you to click that look like from your bank. When you click to the given link, it will not direct you to your bank website but you will redirect you to fake website that look similar to your bank website. When you logon to the fake website, it will collect your user ID and password than they will use it to the actual bank website...you know what happen next.
This is information from trendmicro.
Now there's new phishing technoque, no URL link or redirection within this email like the old phishing mail. So how the new phishing work? You receive email and if the customer reply the mail, then they are “fish” by the phishing mail. So from this new phishing technique, the user awareness is very important to educate user on how to be more aware on nowadays security risk in order for them to avoid being “fish” by the phisher.
The phisher can hijack the legitimate domain name and this can avoid them to slip through our ERS filter and no URL or redirection to avoid being filter by our WRS. So it is time to promote the TAAS to educate our customer in handling today’s threat and awareness. Below is the sample email that use new phishing technique.
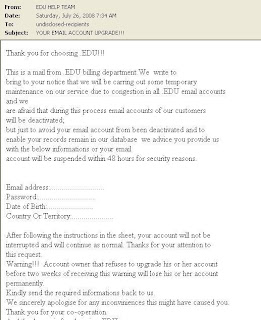
So please beware and always double check with your bank. share this with your friend.
(Computer Networking Solution)
Feed Shark
Computer Networking Solution
phishing
networking problem
computer network security
computer network maintenance
computer network installation
Turbo Tagger
Thursday, July 17, 2008
Why I cannot Print???? (Computer Networking Solution)
Computer Networking Solution
One of common problem that I face in daily job is printer cannot print. By the way I work in IT department and one of my jobs is to settle user computer problem.
So, back to the printer problem. Normally user will call and say “I cannot print…why?”, User also will say, “This morning I can print….why now I cannot print?. User will call direct to IT people when they face problem.
Normally when I received that call, I will ask, is there any error message? They will say “ I don’t see any error message” or “Too long for me to read” or “I don’t understand what it says”. I may ask another question in order to rectify the problem over the phone. Some user don’t like it and simply say “You just come over here and settle my problem”.
So basically, when we face problem with Computer, look at the error message, try to understand it and follow as instructed. If you have no idea what it says, presses the ‘print screen’ button and paste to excel or words. Pass the file to your IT guys. The message is important for IT people to understand about the problem and solving process will become faster.
You can troubleshoot the problem by you self by doing simple check.
1. Check weather the printer was installed in your Computer or not? This may sound strange but for me this is what you should check first.( For WinXP SP2 – Click Start -> Printers and Faxes)
2. At the same place also, check the status of your problem/default printer, is it ‘ready’ or ‘offline’? Is the printer icon blur or not? If ‘ready’, means and the printer icon is not blur, means the printer is OK, you should be able to print. If you cannot print, the problem is not with the printer, look at others. If the printer status is ‘offline’ and the printer icon is blur, than you need to make the printer online.
a. If it is a network printer ( the printer has it own IP Address )- Check weather the printer is on or not. Check also for any error message. From the message start your troubleshooting.
b. If the printer is ‘network’ printer but connected to other computer in your office LAN(Local Area Network), please check if the computer that the printer connected to it is on or not? Try to print from the computer that the printer connected to it. You will not able to print to that printer until the computer that the printer connected to it is able to print.
3. After you try all, but still not working than call your IT guy.
For my case, the message that I receive is 'too many connection'. So I just reset ( on and off ) back the printer and the user is able to print as normal. :)
Computer Networking Solution
Feed Shark
HP Printers
Printer Driver
brother printers
epson printers
fargo printers
canon printers
Turbo Tagger
Wednesday, June 25, 2008
10 tips on how to help reduce spam: Computer Networking solution
Computer Networking Solution: This article is taken from Microsoft website, and it’s a good article and I want to share with all of you. This is because SPAM is never ending story(at least at this time)
At the moment what we can do is try to reduce it by practicing simple method that is listed below. We also should change our way in handling our email address. Do you know why people like to SPAM, for me because it’s work. Many of us give good responding to SPAM. So it’s time to change and share this info with your family, friends and colleague.
10 tips on how to help reduce spam
Applies to: Microsoft Office Outlook 2007
Follow these guidelines to help lower your risk of receiving junk e-mail.
1. Take advantage of the Junk E-mail Filter in Microsoft Office Outlook 2007 Office Outlook 2007 helps to mitigate the problem of spam by providing the Junk E-mail Filter, which automatically evaluates incoming messages and sends those identified as spam to the Junk E-mail folder.
2. Block pictures in HTML messages that spammers use as Web beacons Office Outlook 2007 has an additional anti-spam feature. By default, this feature blocks automatic picture downloads and other external content in messages if the content is linked to a server. If you open a message that has external content when this feature is turned off, the external content downloads automatically, inadvertently verifying to the server that your e-mail address is a valid one. Your e-mail address can then be sold to a spammer. You can unblock external content for messages that come from sources that you trust. For details, see Block or unblock automatic picture downloads in e-mail messages.
3. Turn off read and delivery receipts and automatic processing of meeting requests Spammers sometimes resort to sending meeting requests and messages that include requests for read and delivery receipts. Responding to such meeting requests and read receipts might help spammers to verify your e-mail address. You can turn off this functionality. However, read and delivery receipts and automatic processing of meeting requests are useful features that you should not be afraid to use within a secure corporate network.
Note Delivery receipts can be turned off only by your e-mail server administrator.
Turn off read receipts
1. On the Tools menu, click Options.
2. Click E-mail Options.
3. Click Tracking Options.
4. Under Use this option to decide how to respond to requests for read receipts. Only applies to Internet Mail accounts, click Never send a response.
Turn off automatically acceptance of meeting requests
5. In Outlook, on the Tools menu, click Options, and then click Calendar Options.
6. Under Advanced options, click Resource Scheduling.
7. Clear the Automatically accept meeting requests and process cancellations check box.
4. Limit the places where you post your e-mail address Be cautious about posting your e-mail address on public Web sites, such as newsgroups, chat rooms, bulletin boards, and so forth. When visiting public sites, you might want to use an e-mail address that is different from your main e-mail address. Remove your e-mail address from your personal Web site. Whenever you list or link to your e-mail address, you increase your chances of being spammed.
5. Review the privacy policies of Web sites When you sign up for online banking, shopping, or newsletters, review the privacy policy of the site carefully before you reveal your e-mail address or other personal information. Look for a link or section (usually at the bottom of the Web site's home page) called "Privacy Statement," "Privacy Policy," "Terms and Conditions," or "Terms of Use." If the Web site does not explain how your personal information will be used, consider not using the services at that site.
6. Watch out for check boxes that are already selected When you shop online, companies sometimes add a check box that is already selected, which indicates that it is fine with you if the company sells or gives your e-mail address to other businesses (or "third parties"). Clear this check box so that your e-mail address is not shared.
7. Don't reply to spam Never reply to an e-mail message — not even to unsubscribe from a mailing list — unless you know and trust the sender, such as when the e-mail message comes from a service, an online store, or newsletter that you have signed up with. Answering spam just confirms to the spammer that your e-mail address is an active one.
8. If a company uses e-mail messages to ask for personal information, don't respond by sending a message Most legitimate companies will not ask for personal information to be sent in e-mail. Be suspicious if they do. Such a request could be a spoofed e-mail message disguised to look like a legitimate one. This tactic is known as phishing. If the possible spam appears to be sent by a company that you do business with — for example, your credit card company — then call the company to verify that they sent it, but don't use any phone number that is provided in the e-mail. Instead, use a number that you find by using other means, such as directory assistance, a statement, or a bill. If the request is a legitimate one, the company's customer service representative should be able to assist you. The Junk E-mail Filter also includes phishing protection to help identify and disable suspicious messages.
9. Don't contribute to a charity in response to a request sent in e-mail Unfortunately, some spammers prey on your goodwill. If you receive an e-mail appeal from a charity, treat it as spam. If the charity is one that you want to support, locate their telephone number or Web site to find out how you can make a contribution.
10. Don't forward chain e-mail messages Besides increasing overall e-mail volume, by forwarding a chain e-mail message you might be furthering a hoax — and meanwhile, you lose control over who sees your e-mail address.
Eventhough this article meant for Microsoft Office Outlook 2007, but some of it we can practice it even we use others email software. This guide is not difficult to practice, so let us start practicing it, and don’t forget to share with your family, friends and colleagues. ( Computer Networking Solution )
Feed Shark
Thursday, June 19, 2008
CDROM Disappear: Computer Networking Solution
Computer Networking Solution: CDROM drive disappear in BIOS
Computer Networking Solution Scenario:
You are installing FREE AVG on your PC which was working
fine previously with C: and D: drives shown and working well.
Strangely the system lost the D: drive (cdrom) not showed.
You could not access it at all. You cannot see it from BIOS and Windows XP Home control
panel/systems. You also reboot your PC more that 2 times but the result still the same.
You also do virus scan and scan for spyware but no found nothing.
No body opened the tower to tamper with power and IDE cables.
What would you do?
Computer Networking Solution: Basic about BIOS
If the drive is not showing in BIOS, you have a simple hardware
failure. The fact that you were installing a windows based program like
AVG is not relevant. It is just one of those things. BIOS is the
basic hardware detection area of your motherboard, and this level of
device management is not even "aware" that a hard drive exists that
might have Windows on it with AVG installed. That process starts at the
end of Power On Self Test (POST) when the system gets around to looking
at the hard drive to see if it is bootable. But the CD drive has
already been detected (or not) by that time.
Computer Networking Solution to try
You can try to do ‘Cold Boot’, a full electrical shut down.
You even need to unplug the power cord for a minute or two just to be sure
"everything" gets back to a "known state". Totally discharge the electricity from the system
Then Boot to the BIOS.
If it is still missing, and it is set to auto configure,
OR the settings are locked for it to be assigned properly,
you will have to open the case.
Nothing you installed "inside Windows" can make a CD-ROM drive
disappear "IN THE BIOS".
DO NOT open the case if the computer is under warranty as
that might kill the warranty also...
Gently remove the proper data cables and power cables and re-seat
them a time or two. THEN check that ALL cables are seated properly.
Computer Networking Solution : Attention
Anytime "anyone" tells you to open a case, you need to know about
proper anti-static precautions.
Get anti-static "wrist thing", or touch bare metal inside the
case to drain any static charge from yourself while working.
Don't work in an area known to cause lots of "sparks" or "snaps"
(when you walk across the rug, etc... . Unless you are "extra"
careful... (That is hard to define unless you are there...)
If you have a high static area it is better to "stay out"...
Good luck – Computer Networking Solution
Feed Shark
Wednesday, June 4, 2008
Microsoft Outlook 2003 error (Computer Networking Solution)
Computer Networking Solution: Cannot start Microsoft Office Outlook. MAPI32.DLL is corrupt or wrong version
This morning when I want to open Microsoft Outlook 2003 I got below message “Cannot start Microsoft Office Outlook. MAPI32.DLL is corrupt or wrong version.” It also suggests reinstalling the Microsoft Office Outlook 2003. I did as suggested, I reinstall Microsoft Office Outlook 2003. After reinstall, I open the Microsoft Outlook 2003 BUT I still received the same message “Cannot start Microsoft Office Outlook. MAPI32.DLL is corrupt or wrong version”
I found one forum at http://www.planetamd64.com , they discuss about this issue. Here are the three solutions that the members give.
Solution 1
I was having numerous overall system problems with Office 2007 so I uninstalled the Beta. I had installed it beside 2003 and not as an upgrade. Everything was back to normal except Outlook which I had no option but to upgrade to the 2007 version. After uninstall, I kept getting an error concerning MAPI32.DLL being corrupt or the wrong version and to reinstall Outlook, which I did (I had a full backup of my folders and emails). After the reinstall, I was still getting the same error and Outlook would not open. I did a search and found that the file listed in the error was not MAPI32.DLL but instead MSMAPI32.DLL.
The folder was Program Files (x86)\Common Files\System\MSMAPI\1033. The non-reverted file was 50 KB in size and had a 5/2006 Date Modified. The correct file should be 1,326 KB with a 6/2004 Date Modified. I copied the correct file from another installation and pasted it into the folder listed above. Outlook then opened and the program was just as it was prior to the upgrade to 2007. If anyone has this same problem and you don't have another installation to copy the file from, let me know and I will get it to you. I don't want to take up space at PAMD64 with that size file as an attachment...talker
Solution 2
No need to download any files at all. Just rename the MSMAPI32.DLL to MSMAPI32.DLL.old found below
Drive:\Program Files\Common Files\System\MSMAPI\1033\MSMAPI32.DLL
Start outlook2003 and it reinstalls the DLL and you don't loose anything.
Solution 3
I would reinstall 2007. Export message store, address books, etc. Uninstall 2007. Reboot. Reinstall 2003 and patch it. Import everything back in
I use solution 2 and it worked like a charm. After I rename the file and start Microsoft Office Outlook 2003, the Microsoft Office Outlook 2003 does the short installation and my Outlook open with all the email remain.
I never try the 2 method as I have no time. Maybe you can try it and reply to me.
Cheers
Computer Networking Solution: Cannot start Microsoft Office Outlook. MAPI32.DLL is corrupt or wrong version
Feed Shark
Friday, May 30, 2008
A Magic Number To Avoid Spam?( Computer Networking Solution)
Spam is a common topic today, all computer user know what spam is? Do you know why people do spamming? The answer is because this method works. It' works in generate sales, membership, opt-in list and etc. This time Computer Networking Solution find an interesting question ask by user in www.pcmag.com. Neil J. Rubenking answer the question.
Q. I was told that e-mail addresses with numbers in them get less spam. Is this true? Is it worth changing my e-mail address for?—Linda Young
A. Spammers get a hold of e-mail addresses in roughly a zillion ways. When you buy something at a small, lesser-known online store there's a decent chance they will sell your address to spammers. Even if it's a big, reputable store that gets your cash, the store's records could still be stolen or leaked. Sign up for a newsletter? Your address could certainly get sold. Ever write comments in blogs or discussion forums that display your e-mail address? Spammers have tools that "scrape" those addresses. That is, they process the text on the page and strip out anything that looks like an e-mail address.
In any of the above scenarios—and plenty more—it doesn't matter what your address is. The one technique your number idea could foil is what is called a "dictionary attack." The spammers get a list of common first names, a list of common last names, and a list of ISP e-mail domains they want to try. Then they generate all possible combinations and fire off a gazillion messages (at next to no cost). Anyone unwary enough to respond gets moved to a list of "live" addresses that can be sold to other spammers. Yes, an address like Joe142857Blow@domain.com would be more resistant to this attack than plain JoeBlow@domain.com.
In general, when you change your e-mail address, it takes the spammers a while to catch up. So any change, with or without a number, will bring temporary relief. If you also change your habits to guard this new e-mail address more carefully, it will take the spammers longer to get you back on their lists. But sooner or later they always seem to find us.(end of answer)
So basically at the moment spam email will still come unless we take precaution. Computer Networking Solution will discuss about it later.
Wiindows XP SP3 Problem: Need urgent attention
Weather you are home user or coorporate user, you should pay attention to this news. This time Computer Networking Solution bring you "Windows XP Service Pack 3 Problems require attention"
Brian Livingston from www.windowssecrets.com mention there is a problem with Windows XP SP3. Susan Bradley in the same news letter encourage us to wait on installing XP SP3 if we don't have urgency. Brian Said the problems with XP SP3 include AMD-based Hewlett-Packard desktop computers constantly rebooting and Symantec antivirus products developing strange behaviors. It makes him wonder which executives at HP and Symantec were supposed to test these companies' products during the months-long beta releases of SP3.
Base on Susan analysis Antivirus software from Symantec Corp. may cause the installation of Service Pack 3 for XP to corrupt the Windows Registry by adding unnecessary keys.
Symantec advises users to disable the SymProtect security feature of its products before applying XP SP3.
Thanks to Susan for th analysis and give us solution. Below is her message.
A Registry fix is needed by the latest XP patch
The latest in the continuing series of problems related to Windows XP Service Pack 3 involves Symantec's Norton AntiVirus. The company recommends that users disable the program's self-protection feature before installing XP SP3.
In a post to Norton's support forum, Symantec senior SQA manager Reese Anschultz suggests that customers disable the SymProtect feature found in various Symantec security products:
• To do this in Norton Internet Security 2008 and Norton AntiVirus 2008, uncheck Turn on protection for Norton products on the Options pages of these programs prior to installing XP SP3. Once the service pack is in place, return to the Options page and re-enable this setting.
• In Norton SystemWorks 2008, open the Advanced Options under Settings, click Next, choose Norton SystemWorks Options, and select the General tab. Uncheck Turn on protection for my Symantec product.
For other Norton products, read Anschultz's post, which comments that other third-party security products may also cause problems unless some functions are disabled before SP3 is installed.
Some Windows Secrets readers have had to remove Norton AntiVirus completely before deploying XP SP3. While taking this step may sound extreme, reader Bert Smith from Australia was told by a Symantec engineer that he should "follow these instructions" to use the Norton Removal Tool to uninstall Norton Internet Security 2008 before he deployed Vista SP1!
Given what we now know, it may actually be wise for you to uninstall Norton antivirus products prior to deploying SP3, which is XP's latest — and last — service pack. Thanks to reader Jan Levine for identifying this issue in the Microsoft TechNet Forums.
If you find that installing XP SP3 has corrupted your Symantec security product, my fellow MVP Bill Castner has devised a downloadable Registry fix (scroll down the page until you see My "Fix"). Castner first identified this issue along with Jesper Johansson, who's been tracking the XP SP3 problem in his blog.
Johansson also provides a patch for AMD computers that XP SP3 causes to reboot constantly. I described this problem in my May 22 column. For more information, see the following item.
A cure for XP SP3's never-ending reboots
If you're one of the folks whose AMD-based PCs constantly reboot after applying XP SP3, here's how you can recover.
When the system is first booting, press F8 to enter Windows' Safe Mode. Log into the Administrator acccount, click Start, Run, type cmd, and press Enter. When the command window opens, type the following command (don't forget the space after the equals sign, which is required):
sc config intelppm start= disabled
The problem is caused by the presence of Intel drivers on AMD-based systems. Follow the above steps only if you know your PC uses an AMD processor; doing so on an Intel-based machine could render the system unusable.
To determine which processor your system uses, open the Control Panel's System applet and click the General tab. (See Figure 1.)
Figure 1. Open the System applet in Control Panel to verify the type of processor your PC uses.
If the processor listed in the window is "Intel," do not enter the command shown above. An Intel-based system that constantly reboots may be having an unrelated problem. It might be caused by conflicts with antivirus products, as described in my previous item, or something else entirely that no one has yet identified.
As I wrote in my May 22 column, there's no rush to install XP SP3. Wait until we know more about these kinds of conflicts.
Thanks again to Susan for this valuable information. Computer Networking Solution will update this issue from time to time.
Brian Livingston from www.windowssecrets.com mention there is a problem with Windows XP SP3. Susan Bradley in the same news letter encourage us to wait on installing XP SP3 if we don't have urgency. Brian Said the problems with XP SP3 include AMD-based Hewlett-Packard desktop computers constantly rebooting and Symantec antivirus products developing strange behaviors. It makes him wonder which executives at HP and Symantec were supposed to test these companies' products during the months-long beta releases of SP3.
Base on Susan analysis Antivirus software from Symantec Corp. may cause the installation of Service Pack 3 for XP to corrupt the Windows Registry by adding unnecessary keys.
Symantec advises users to disable the SymProtect security feature of its products before applying XP SP3.
Thanks to Susan for th analysis and give us solution. Below is her message.
A Registry fix is needed by the latest XP patch
The latest in the continuing series of problems related to Windows XP Service Pack 3 involves Symantec's Norton AntiVirus. The company recommends that users disable the program's self-protection feature before installing XP SP3.
In a post to Norton's support forum, Symantec senior SQA manager Reese Anschultz suggests that customers disable the SymProtect feature found in various Symantec security products:
• To do this in Norton Internet Security 2008 and Norton AntiVirus 2008, uncheck Turn on protection for Norton products on the Options pages of these programs prior to installing XP SP3. Once the service pack is in place, return to the Options page and re-enable this setting.
• In Norton SystemWorks 2008, open the Advanced Options under Settings, click Next, choose Norton SystemWorks Options, and select the General tab. Uncheck Turn on protection for my Symantec product.
For other Norton products, read Anschultz's post, which comments that other third-party security products may also cause problems unless some functions are disabled before SP3 is installed.
Some Windows Secrets readers have had to remove Norton AntiVirus completely before deploying XP SP3. While taking this step may sound extreme, reader Bert Smith from Australia was told by a Symantec engineer that he should "follow these instructions" to use the Norton Removal Tool to uninstall Norton Internet Security 2008 before he deployed Vista SP1!
Given what we now know, it may actually be wise for you to uninstall Norton antivirus products prior to deploying SP3, which is XP's latest — and last — service pack. Thanks to reader Jan Levine for identifying this issue in the Microsoft TechNet Forums.
If you find that installing XP SP3 has corrupted your Symantec security product, my fellow MVP Bill Castner has devised a downloadable Registry fix (scroll down the page until you see My "Fix"). Castner first identified this issue along with Jesper Johansson, who's been tracking the XP SP3 problem in his blog.
Johansson also provides a patch for AMD computers that XP SP3 causes to reboot constantly. I described this problem in my May 22 column. For more information, see the following item.
A cure for XP SP3's never-ending reboots
If you're one of the folks whose AMD-based PCs constantly reboot after applying XP SP3, here's how you can recover.
When the system is first booting, press F8 to enter Windows' Safe Mode. Log into the Administrator acccount, click Start, Run, type cmd, and press Enter. When the command window opens, type the following command (don't forget the space after the equals sign, which is required):
sc config intelppm start= disabled
The problem is caused by the presence of Intel drivers on AMD-based systems. Follow the above steps only if you know your PC uses an AMD processor; doing so on an Intel-based machine could render the system unusable.
To determine which processor your system uses, open the Control Panel's System applet and click the General tab. (See Figure 1.)

Figure 1. Open the System applet in Control Panel to verify the type of processor your PC uses.
If the processor listed in the window is "Intel," do not enter the command shown above. An Intel-based system that constantly reboots may be having an unrelated problem. It might be caused by conflicts with antivirus products, as described in my previous item, or something else entirely that no one has yet identified.
As I wrote in my May 22 column, there's no rush to install XP SP3. Wait until we know more about these kinds of conflicts.
Thanks again to Susan for this valuable information. Computer Networking Solution will update this issue from time to time.
Monday, February 25, 2008
How to download Youtube video.
The note below I took from yahoo group called simplycomputer2@yahoogroup.com. A person post a question to the group about how to save a youtube video to personal Computer. One of the group member named “ordinaryfoolisnj” give below answer.
There many programs to help you save Youtube videos, as well as amethod that uses the Internet Explorer browser internet files to do so. I use a program formerly called "KeepIt!" -- now available asVideoDownloader -- to save Youtube vids: http://javimoya.com/blog/youtube_en.php Instructions on its very simple to use interface are on the site, but briefly, you go to Youtube and start the video that you wish to keep, then copy the website address and paste it into the box indicated atthe website above. They then present a video download link for you. You click the download link, then save the video as whatever name you wish plus the .flv extension. Its key that you add the .flv extensionto the end of the new file name. You can "get" your Youtube video directly via the website abovewithout downloading anything, or with the plugin for FireFox. I've used them both successfully. The other way to get the video if you're using Internet Explorer, is to:
a. Let the video load completely (let it run once).
b. Go to your C drive and navigate to Documents and Settings, name ofthe account you're in, Local Settings, then Temporary Internet files.This shows all of the web information that has downloaded into the IEbrowser in order for you to view them.
c. Find a file that starts with name "GetVideo?vid..." (it should bea fairly large sized file).
d. Drag it to your desktop.
e. Rename the file to whatever you want with an .flv extention (thisis CRUCIAL).
Viola.
Now you need a flash content player. I use a player called FLV Player to view my downloaded Youtube videofiles (simply drag and drop the "whatever the name.flv" file from where its stored on the hard drive or CD onto the open FLV window). http://www.download.com/FLV-Player/3000-2139_4-10467081.html.
Most of the videos I think are not high enough quality to convert to DVD burnable files (I usually burn the .flv files and the player toDVD or CD to view later as data files). But there is a free program called Super that some guys and gals hereon the list have recommended to convert the .flv file to mpeg, etc.http://www.erightsoft.com/SUPER.html I've given you a lot of information, but don't be confused as allprocesses are very, very easy once you're run through it once. I hope that this helps,Nancy J
End of his/her answer.
Thursday, February 21, 2008
Make your computer dual-boot Vista and XP
I received this article from Windows Secret Newsletter. I found it is a great article. So I put on my blog so my friends, readers and for myself to refer next time. Because we don't know when we need it. Frankly speaking I haven't try this tip's. I will try next week after I received my new Dell Latitude Notebook. By the way this article was written by Scott Dunn.
"It's getting harder to buy a new computer with Windows XP installed and — after Microsoft stops selling XP on June 30, 2008 — it will become nearly impossible. Fortunately, you can have your XP cake and eat your Vista, too, by setting up your system to boot between the two operating systems.
Add an XP option to your new Vista system.
If a new computer arrived in your recent past, or you plan to buy one in the near future, chances are it will come with Windows Vista installed. Although some manufacturers still give you the option of getting XP on your new system, that option is likely to dry up for most consumers later this year when Microsoft stops selling Windows XP. If you're not ready to dive into Vista all at once, there is an answer: set up your Vista computer to dual-boot between Vista and XP. In this article, I'll tell you how to make your PC give you a choice between Vista and XP every time you start up. In a separate article coming soon, I'll give you some additional tips that save disk space on a dual-boot system. Although some sources, such as Computer Shopper Magazine, advise that you need an add-on product like VistaBootPro to dual-boot, you can accomplish the same thing without any additional software other than the two operating systems. Before starting, make sure you have your Windows XP install discs ready as well as your Windows Vista DVD. In addition, it's a good idea to make a complete system backup before beginning an operation like this. Once you've laid that groundwork, you're ready to go to work:
Step 1. In Vista, click Start, type diskmgmt.msc, and press Enter. Click Continue if prompted by User Account Control.
Step 2. Right-click a drive and choose Shrink Volume. Specify the amount to shrink, which in this case is the amount you want for your XP partition. At a minimum, you'll need around 2.5GB for XP Pro SP2. I suggest you select a larger partition to leave room for updates and other files that may need to be on the same drive as XP. Because I wanted a 5GB partition, I typed 5000 (representing 5,000 megabytes) in the available box. Click Shrink.
Step 3. Right-click the newly available area and choose New Simple Volume. Follow the steps in the wizard to assign a drive letter now, or wait until the next step. When prompted, check Perform a quick format to format the volume with NTFS.
Step 4. When the wizard is done formatting the new volume, you can assign or rearrange drive letters as needed. For example, changing drive letters may also put your CD/DVD drive in a more logical order.To do that, right-click a volume or the CD/DVD drive and choose Change Drive Letters and Paths. If a volume hasn't got a drive letter yet, click Add. Otherwise, select the drive icon in the dialog box and click Change.If you're rearranging the letters on existing drives, you may need to change the drives in a particular order. Or you may need to give a drive a temporary letter (such as Z) to free up a letter for another drive; you would change the Z drive to something else later. Make your selection and click OK. Repeat for other partitions or drives until you have the order you want.
Step 5. When you're done with your partitioning chores, exit Disk Management. Insert your XP disc into the drive and restart your system, booting from that disk.
Step 6. Follow the steps to install XP. When asked for the target drive, select your new partition and press Enter. Because you already formatted this partition with NTFS, you can skip the formatting step. At the appropriate screen, arrow down to Leave the current file system intact (no changes) and press Enter. Continue the installation process until it's finished and XP has started.
Step 7. Your system now boots to XP, so we'll need to do some fixing to set up a boot menu. Insert your Vista DVD and restart the computer from it. Click Next in the first screen.
Step 8. Don't click Install when prompted! Instead, click Repair Your Computer in the lower-left corner.
Step 9. When the System Recovery Options dialog appears, make sure Microsoft Windows Vista is selected and click Next. In the next dialog box, select the Command Prompt option at the bottom.
Step 10. In the command-prompt window, type the following commands and press Enter after each one:
bootrec.exe /fixMBR
bootrec.exe /fixBoot
Step 11. Close the command prompt and click Restart.
Step 12. When your computer has booted into Vista, click Start, type cmd.exe, and press Ctrl+Shift+Enter to make the command window open with elevated privileges. Click Continue, if prompted by User Account Control.
Step 13. Type the following commands in the command window, one at at time, pressing Enter after each one. After each command, you should get the response, "The operation completed successfully." A response of, "The specified entry already exists," is OK, too. If not, retype your command to make sure you've entered it correctly. If Vista is installed on a drive other than c:, change the first command below to use the proper drive letter. The curly braces around {ntldr} in each command must be typed exactly as shown:
bcdedit -set {ntldr} device partition=C:
bcdedit -set {ntldr} path \ntldr
bcdedit -displayorder {ntldr} -addlast
bcdedit -set {ntldr} description "Microsoft Windows XP"
That's it! The next time you restart your system, you should be see a prompt that will let you choose between Vista or XP. Select the one you want and press Enter.
How to customize your boot menu
When you start your dual-boot system, the menu will appear for a few seconds. If you don't press any keys, eventually Windows Vista will start. Fortunately, you can change this if you don't want Vista to be your default operating system. You can also customize the waiting period before the default kicks in.
Here's what to do:
Step 1. Click Start. Type systempropertiesadvanced and press Enter. Click Continue, if prompted by User Account Control.
Step 2. Under Startup and Recovery, click Settings.
Step 3. At the top of the dialog box, select the operating system you want to start by default.
Step 4. In the box to the right of Time to display list of operating systems, specify the number of seconds for the options to stay on screen. Click OK. Microsoft provides documentation of Vista's bcdedit command and its parameters in an article in the Windows Vista Technical Library."
Hope you all can try it...
Friday, January 11, 2008
My experience downgrading Windows Vista to Windows Xp.
My company bought a brand new HP notebook with Windows Vista installed. Due to business reason I have to downgrade it to Windows Xp Pro. I thought it is straight forward process, so I just grab my Windows Xp Pro installer( Original) and put it inside the DVD drive. I restart the notebook and make sure the notebook boot from Windows Xp CD. As normal I reach to the screen where I have to select weather to install, repair or quit. I hit the enter key for install, and the next message I get is the installation cannot continue because no hard disk detected. I thought I make mistake and repeat the process. Again I received the same message. So I know something not right. I do a search using google and manage to get a few opinion from forum. I tried and one method work for me. The process that I did is,
1.Make sure the new HP notebook has driver for Windows XP Pro. I check with HP website and yes, there is driver for Windows Xp Pro. So I download and keep the driver in my external Hard Disk.
2.With the Windows XP CD still inside the DVD drive, I turn on the notebook
3.Keep tapping the F10 key when the Compaq logo appears. This will take you to BIOS Setup Utility.
4.Using arrow key I go to “System Configuration tab”.
5.Under that select you will see SATA Native support. The default value is enable, so I disable it.
6.Press F10 to "Save and Exit" the BIOS.
7.Click on OK/Yes to confirm the changes.
8.Restart the notebook.
9.The notebook boot up from Windows XP CD.
10. As normal, I reach to the screen where I have to select weather to install, repair or quit. I hit the enter key than I get the screen that show the partition.
11.After that I just do as normal and I manage to install Windows XP Pro. :-)
Feed Shark
Network Solutions
Computer Network
Home Network
Wireless Network
Network Security
Network Troubleshoot
Turbo Tagger
Wednesday, January 2, 2008
4 things to do when use public computer.
Public Computer is the computer that we can find it libraries, Internet cafes, airports, copy shops and other place that allow people to access internet. It is very convinience, but we must take precoution. Here are the precoution list.
1. Don't ever save your logon information.
Always log out of Web sites by clicking "log out" on the site. It's not enough to simply close the browser window or type in another address. Many programs (especially instant messenger programs) include automatic login features that will save your user name and password. Disable this option so no one can log in as you.
2. Don't leave the computer unattended with sensitive information on the screen.
If you have to leave the public computer for a while, log out of all programs and close all windows that might display sensitive information.
3. Don't forget to erase your tracks.
Web browsers such as Internet Explorer keep a record of your passwords and every page you visit, even after you’ve closed them and logged out.
To disable the feature that stores passwords.
Before you go to the Web, turn off the Internet Explorer feature that "remembers" your passwords.
1. In Internet Explorer, click Tools, and then click Internet Options.
2. Click the Content tab, and then click AutoComplete.
3. Click to clear both check boxes having to do with passwords.
To delete your temporary Internet files and your history.
When you finish your use of a public computer, you should delete all the temporary files and your Internet history.
1. In Internet Explorer, click Tools, and then click Internet Options.
2. On the General tab, under Temporary Internet files, click Delete Files, and then click Delete Cookies.
3. Under History, click Clear History.
Don't enter sensitive information into a public computer.
These measures provide some protection against casual hackers who use a public computer after you have. But keep in mind that an industrious thief might have installed sophisticated software on the public computer that records every keystroke and then e-mails that information back to the thief. Then it doesn't matter if you haven't saved your information or if you've erased your tracks. They still have access to this information. If you really want to be safe, avoid typing your credit card number or any other financial or otherwise sensitive information into any public computer.
And lastly watch for over-the-shoulder snoops.
When you use a public computer, be on the look out for thieves who look over your shoulder or watch as you enter sensitive passwords to collect your information
Subscribe to:
Posts (Atom)
